
Do you have a GM vehicle between 1980 to 1995? If so, there is a big chance your car has an OBD1 connector (ALDL).
This connector is unique and applies to Pontiac, Chevrolet, GMC, Oldsmobile, Cadillac, and Buick, and more. The positive thing with the OBD1 connector is that you can read the trouble codes at home without any diagnostic tools.
There are special diagnostics tools for this kind of connector, but they are not necessary – you can read them just as well without a tool.
If you have a newer car produced after 1996, you have OBD2 codes in your vehicle, and this article will not apply to your car. You can check our other article with OBD2 codes.
In This Article:
OBD1 Trouble Code List
Here is a complete OBD1 trouble code list. The on-board diagnostic codes’ meanings can differ a bit depending on what car model you have, but most of them are the same among all car manufacturers. We do not take responsibility for any faults in this code list. Check your repair manual for the trouble codes of your car model.
| Code | Description |
|---|---|
| 12 | System OK ( Diagnosis mode active ) |
| 13 | Oxygen O2 Sensor – Circuit open/no activity |
| 14 | Coolant Temperature sensor – Resistance too high or shorted circuit |
| 15 | Coolant Temperature Sensor – Circuit low or open |
| 16 | Direct ignition system (DIS) – Faulty circuit / shorted circuit |
| 17 | Camshaft Position Sensor – Circuit/timing error |
| 18 | Camshaft or Crankshaft – Sensor/circuit/timing error |
| 19 | Crankshaft sensor – Sensor/circuit/timing error |
| 21 | Throttle position sensor – Out of range/Performance |
| 22 | Throttle position sensor – Low Voltage |
| 23 | Intake Air temp sensor – Out of range, low resistance |
| 24 | Vehicle speed sensor – Circuit fault |
| 25 | Intake Air temp sensor – Out of range, high resistance |
| 26 | QDM A ( Quad-driver module ) – Circuit #1 fault |
| 27 | QDM A ( Quad-driver module ) – 2nd gear circuit |
| 28 | QDM A ( Quad-driver module ) – Circuit #2 fault |
| 29 | QDM A ( Quad driver module ) – 4th gear circuit |
| 31 | Wastegate solenoid – Circuit fault |
| 32 | EGR ( Exhaust Gas Recirculation ) – Circuit fault |
| 33 | Manifold Air Pressure Sensor – Signal out of range, high resistance |
| 34 | Manifold Air Pressure Sensor – Signal out of range, low resistance |
| 35 | Idle air control valve / Sensor – Circuit fault |
| 36 | Ignition system – Circuit error/fault |
| 38 | Brake input ( Brake switch sensor ) – Circuit fault |
| 39 | Clutch input ( Clutch sensor ) – Circuit fault |
| 41 | Camshaft sensor – Circuit fault or ignition control – circuit fault/error (depending on the car model) |
| 42 | EST (Electronic spark timing) – Circuit grounded/shorted |
| 43 | Knock sensor / Electronic spark control – Circuit fault error (depending on the car model) |
| 44 | Oxygen O2 sensor – Lean Mixture |
| 45 | Oxygen O 2sensor – Rich Mixture |
| 46 | Pass-key II – Circuit or Power steering pressure switch – circuit fault error (depending on the car model) |
| 47 | PCM data – Circuit error |
| 48 | Misfire (diagnosis) |
| 51 | Calibration error – Mem-cal, ECM, or EPROM failure |
| 52 | Engine oil temperature circuit – Low temperature indicated / circuit error |
| 53 | Battery voltage – Low/high/error or Egr valve solenoid 1 – circuit error (depending on the car model ) |
| 54 | Fuel Pump – Circuit error or Egr valve solenoid 2 – Circuit error (depending on the car model ) |
| 55 | ECM PCM – Circuit error or EGR valve solenoid 3 – Circuit error (depending on the car model ) |
| 56 | Quad-driver module (QDM B) – Circuit error |
| 57 | Boost control – Error / Faulty |
| 58 | Vehicle anti-theft system ( VATS ) – Circuit faulty |
| 61 | AC (Air conditioning) system performance or degraded oxygen sensor signal (depending on the car model) |
| 62 | Engine oil temperature sensor – High temperature indicated |
| 63 | Oxygen O2 sensor right side – Circuit open or MAP (manifold air pressure sensor ) – out of range (depending on the car model ) |
| 64 | Oxygen O2 sensor right side – Lean mixture indicated |
| 65 | Oxygen O2 sensor right side – Rich mixture indicated |
| 66 | A/C (Air conditioning ) pressure sensor – Circuit low pressure |
| 67 | A/C (Air conditioning ) pressure sensor – Circuit or a/c clutch – circuit failure (depending on the car model) |
| 68 | A/C (Air conditioning ) compressor relay – Circuit failure error |
| 69 | A/C (Air conditioning ) clutch – Circuit/pressure high |
| 70 | A/C (Air conditioning ) refrigerant pressure – Circuit high |
| 71 | A/C (Air conditioning ) evaporator temperature sensor – circuit low |
| 72 | Gear selector switch – Circuit error/fault |
| 73 | A/C (Air conditioning) Evaporator temperature – Circuit high |
| 75 | Digital EGR #2 – Solenoid error/faulty |
| 76 | Digital EGR #3 – Solenoid error/faulty |
| 77 | Digital EGR #1 – Solenoid error/faulty |
| 79 | Vehicle speed sensor (SS) – Circuit signal high resistance |
| 80 | Vehicle speed sensor (VSS) – Circuit signal low resistance |
| 81 | Brake input data – Circuit faulty |
| 82 | Ignition control (IC) 3X – Signal error/faulty circuit |
| 85 | Prom – Error/faulty circuit |
| 86 | Analog/digital – Pcm error /faulty circuit |
| 87 | Eprom – Error / faulty circuit |
| 99 | Power management – Error / faulty circuit |
OBD1 Connector Location
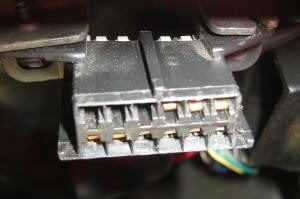
The OBD1 connector is usually located under your steering wheel, under the dash. The connector may have a black plastic cover, which you must remove before accessing it. The connector is often black and has 12 pins on it; pretty easy to identify.
Check the image above to see what an OBD1 connector looks like
OBD1 Connector Wirings Pinout
The OBD1 connector has 12 pins, but not all of them are used in most car models. The standard pins, like the ground, power, and a diagnostic pin, are the same in most car models though.
Make sure you connect your wires correctly. If you are not careful, you may damage your vehicle’s electrical system and control units, which can be very expensive.
This is how the pinout of the OBD1 connector looks like in most car models. Check your repair manual for the exact pinout:

- A = Ground
- B = Diagnosis Terminal
- C = A.I.R
- D = Service engine soon light
- E = Serial Data
- F = T.C.C
- G = Fuel pump
- H = Brake Speed input
- J = None
- K = None
- L = None
- M = Serial Data
RELATED: ELM327 Bluetooth Pin/Key Code
How to Read OBD1 Codes at Home
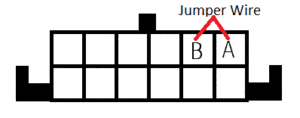
The reading method without a diagnostic tool is to short the circuit of pin A and pin B. The car will then enter the diagnostic mode and flash the “check engine Light” several times, and we should count the flashes to figure out the diagnostic codes.
How to read the OBD1 codes:
- Always connect a car battery charger to your car when doing any electrical work that requires the ignition to be on. Low voltage can cause a lot of trouble with the troubleshooting process; it may cause you to read many incorrect error codes.
- Put a jumper wire between PIN A and PIN B.
- Let the jumper wire sit there and turn the ignition to ON. Do not start the engine.
- The check engine light will begin to flash. Count the flashes. There will be a longer pause between the codes if you have several trouble codes and a shorter pause between the trouble codes’ digits. For example, code 16 = 1 flash * Pause * 6 flashes.
- When all trouble codes are outputted, it will flash the code 12 – 1 flash * Pause * 2 flashes.
- Write down all the trouble code numbers you got and check the trouble code table further down in the article.
- Remove the jumper wire and car battery charger.
OBD1 Code Reader
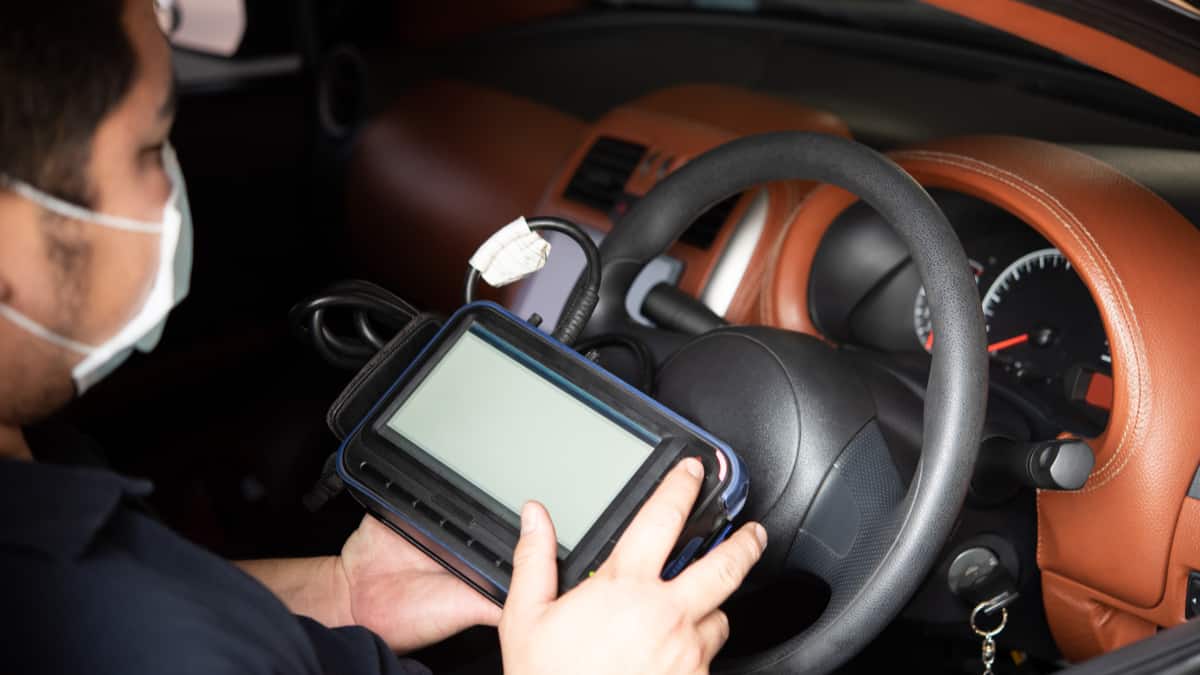
There are also many OBD1 code readers on the market to make the job easier. With an OBD1 code scanner, you do not have to short the connector, and you do not have to count the flashes on the dashboard.
You will get the problem in clear text on your device, and this is, of course, a great investment if you are reading a lot of trouble codes from older vehicles.
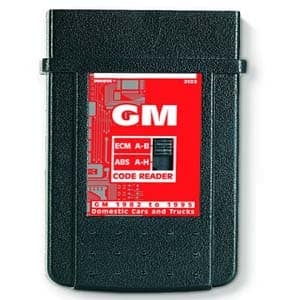
There are several different code scanners on the market in all different price ranges. Some scanners can read both OBD1 and OBD2 codes, but these are pretty expensive. One really affordable scanner that I found is the Innova 3123. You have two different options, Ford or GM vehicles that you can choose from. If you want to look further at the scanner, you can find it here on Amazon.


Hi, my name is Tim.
I have 1993 Chevrolet k2500 with a 7.4L 454 and 4L80E transmission. I read the codes with a paper clip and found im getting:
68- A/C clutch relay error (shorted to ground)
85- PROM error
86- ECM Analog/ digital error
87- EEPROM error (flash memory error)
My truck is hard shifting into 2nd and will not go into overdrive. Any ideas would be greatly appreciated.
Thank you!
Hello everyone I have a 1995 Chrysler Concorde 3.5 and I’m get codes 41 and 33 can anybody help me out with this pls
I have a 1989 Buick LeSabre it runs great until the engine light check engine service soon light comes on this can be at any time sometimes it comes on when it started up sometimes it might not come on driving it all the way to work 6 miles this did not start happening until I had my gas tank dropped in my fuel pump fuel sending unit changed when the check engine light comes on its leg I have a parachute tied to the back of my car sluggish they do not have a OBD1 that fits my vehicle the ones they have a rectangle I need the one that is triangle shaped and it’s under my ashtray where can I get one and what’s wrong with my car thank you
I have a 95 Chevy Silvetado c1500 with 5.7 engine. It starts but sputters and stalls shortly as it warms up. It had a 32 code by using the service engine light. I replaced the egr valve and the code went away
Also changed the fuel valve assembly, but the problem persists. Can it be the catalytic converter. If so will drilling a hole before it allow it to run? Thank you for any advice you can provide.
I have a 1992 Chevy kodiak w/ 366 gas engine. Having issues trying to get codes. Tried using the paperclip mthed but not getting anything (no flashes).
Have any ideas why I’m not getting anything?
Thank you, look forward to a response
Hallo al!,
I have a pontiac firebird 3rd gen.
When i am driving the CEL light come’s on. But when i test it te light blinks 3 times fast.
Does anyone now what is wrong with this code?
Thanks in advance for your comment
HI,… I’ve a 1994 Winnebago Brave (P-30) with 454ci 7.4 litre TBI engine. Dropped fuel tank & cleaned it, installed new fuel sending unit, fuel pump, strainer, fuel filter. – Using the OBD1 I get a code 36 (MAF sensor) – engine starts, runs rough, lean at higher rpm’s, rich at idle . I’ve replaced the ICM. – I’ve noticed that there are NO ignition warning lights when turning on the ignition. It has an 78 gal. fuel tank, I’ve got 25 gallons of 93 octane fuel in it & a bottle of “Sea Foam” treatment in it.
I’m going to clean the MAF sensor, but, I’m concerned about the NO ignition light or dash warning lights (bulb test) when the ignition is turned on. CODE 36 on some OBD1 charts equates to: “Ignition System Circuit Fault/error… Could this be an additional problem with the ECU ?
I’m going to “clear” the ECU & see if any new codes appear, I think that the ECU may be showing the code of its old analysis.
I’m concerned now about the ‘NO dash warning/ignition lights” when I turn on the ignition & wonder if it is related to the ECU or actual ignition switch.
I’ll know more after I clear the codes & start with a cleared ECU.
Thanks in advance for any comments.
P.S., – the unit sat-up for a year & only has 70,000 miles on it.
Have a 1995 daewoo lanos that dont want to start. Did diagnostic and counted the flashes but get confuse. 1 pause 1 1 long pause x 3 then 7 flashes so dont know what it means. Please assist
1988 Chevrolet 2500 Pickup – Scanner Won’t communicate – Paperclip Won’t work & Much More
1988 Chevrolet 2500 pickup with 350 engine, TBI and OBD1. I bought the truck in 1990 with 21,000 miles on it. It is now up to 280,000. Within the last 3 years most of the sensors and connectors have been replaced. A new distributor and coil was put on about a year ago. Fuel pump and filter is brand new and the fuel pressure is right at 12 lbs. Installation of the pump was prompted by poor engine performance and low fuel pressure. Pump was very old and had a break in the suction tube. Engine performance was restored.
For several years I have used a Actron 9145 scanner to trace minor problems and make repairs. About a months ago I had what I thought was a check engine light come on. I discovered that the Actron would not communicate with the ECM and showed I had a Link Error or something similar. I attempted to read the codes the old fashioned way with a paper clip jumper and had negative results. The engine seemed to be running fine and I disconnected the battery and cleared the codes. After a three mile drive, I parked the truck and tried to use the Actron again to look for codes or read data. I could not communicate but the check engine light was not on indicating a problem. Later in the day, I started the truck and the Check Engine Light came on. I turned the engine off and came inside to do some auto repair research on the internet. After about 45 minutes I went out and started the truck and I did not have a Check Engine Light. Again I went for a short drive and everything remained normal and I I did not have a Check Engine Light . Tried to scan and could not communicate. After about 30 minutes I started the truck and had the Check Engine Light back. Tried to scan and could not communicate. After 20 minutes I found that the Check Engine Light had cleared.
Recap of above paragraph:
Had Check Engine Light
Actron 9145 would not communicate with the ECM
Paper clip method would not work either
Went for a drive and parked with Check Engine Light (CEL) still showing
Disconnected the battery and cleared the codes
Went for 3 mile drive…..no CEL…..running fine.
Tried to use the Actron 9145…..could not communicate but the CEL was not on indicating a problem
Later in the day, I started the truck and the CEL came on
After 45 minutes, started truck and CEL had gone off
Short drive…running fine….No CEL
Tried to scan and could not communicate
After about 30 minutes…. Started the truck and CEL was back
Tried to scan and could not communicate
After 20 minutes, started truck and the CEL had cleared
I have ALLDATAdty and ran the GM flow charts to check for missing voltage, broken cables and bad connections between ALDA connector and ECM. My problem does not completely match any of the ALLDATA chains of testing but ran with their thinking in hopes I would stumble into the problem. Didn’t happen. Your help would be appreciated.
I have a Buick 1994 limited edition roadmaster. When I wire jump it off the service light won’t stop blinking it blinked 37 times back to back then didn’t blink anymore
What should I do?
Hello,I’m Oyin and my sweet baby Nissan primera 2.0 is giving me a heartache by blinking the check engine light at its will and resetting itself after removing battery terminals for almost 24hours …so disappointing at times. Kindly help me with suggested solutions… I’ve also been advice to get rid of the code but so worried that this decision might affect its brain box and maybe other functions.. Thanks in anticipation
94 caprice 4.3L V8. OBD1 trouble codes can not be extracted. I jumper A and B top right ports and turn key on then the Fans turn on to high and no check engine light flashing.
Also this car is known for when giving hard acceleration it kicks on check engine light along with both cooling fans on high speed. After this happens you can pull over and turn car off, start it back up and all is fine until the next hard acceleration.
Would anyone have an idea as to what’s going on?
Thanks,
Jared
If the cooling fans are starting suddenly, there might be a problem with a coolant sensor. Did you tried with an OBD1 scanner like the INNOVA 3123? Check all power wires and ground to the engine control unit.
I had the same car and same year the lt1 optispark destibutor could be going out. This happened to me a few times also got a bad one in the mail and had trouble getting it to start, had trouble accelerating at almost full throttle
86 Corvette
Engine code 8
Seems as if it is in limp mode
I jumped A and B terminals
Did not not flash any thing.
Also tells me to upshift in park lol.
Check engine light randomly flashing while idling…
All of it is confusing, I think I have a pcm issue.
Thanks Dennis Meyers
It may be a problem with the transmission control unit or a speed sensor/shift lever. To me it sounds like that the Transmission control unit does not get any speed information and therefore thinks it speeding while staying in park.
Hello, thanks for making this web page, it really helps. I have identified my error code as a code 36, “ignition system circuit error”. So what exactly does that mean? Missing 12v on a specific input pin on a electric device? Where do I start looking?
My vehicle is a 1995 Winnebago Itasca Sunrise, 7.4L TBI engine. This is my home and I’ve had this error since I got the unit a year ago. Seems to run ok, maybe a little rich. Any help would be greatly appreciated. I’m a pretty good mechanic, just not a lot of experience on a chevy 7.4L.
Thank You so much for your time..
Hi, I’m not familiar at all with this car engine. However, this trouble codes does often means that there is a wiring problem to the distributor or the ignition coil. It could also be a caused distributor/coil. To measure this you need a wiring diagram to find out which pins should get 12+ b+/12v ign and ground/Signal
hi magnus
i have an 84 oldsmobile (family car since 1984) and have used the diagnostic link regularly
most recently the dashboard doesn’t flash anymore
it still makes that pulsing buzzy noise but no blinking lights
car runs great otherwise
any reasons why this is happening?
thanks
philip
If I can understand your question correctly, there may be a broken bulb inside the instrument cluster. There are several videos on the web of how to replace them or check them with a multimeter if you would like to 🙂
Hi. I am pleased to find your trouble code site. Thank you. My name is also Magnusua. I own a 90′ GMC. 5.7L. Can you confirm that the codes are shown through the “RED -BRAKE LIGHT” flashing?
The brake light flashing in a pattern may have other trouble codes. I recommend you to find a list of the ABS codes or use an OBD1 code scanner instead to be 100% sure 🙂
Obd1 trouble codes
1991 jeep wrangler yj 4.0l
22: Coolant sensor signal out of range
24: throttle sensor signal out of range
What is the definition or meaning of sensor signal out of range? And what would be the best way to fix the problem and clear the codes?
-any and all info will help! Please. And thank you.