
If you check your oil levels frequently, you are more likely to find problems early before they become too severe.
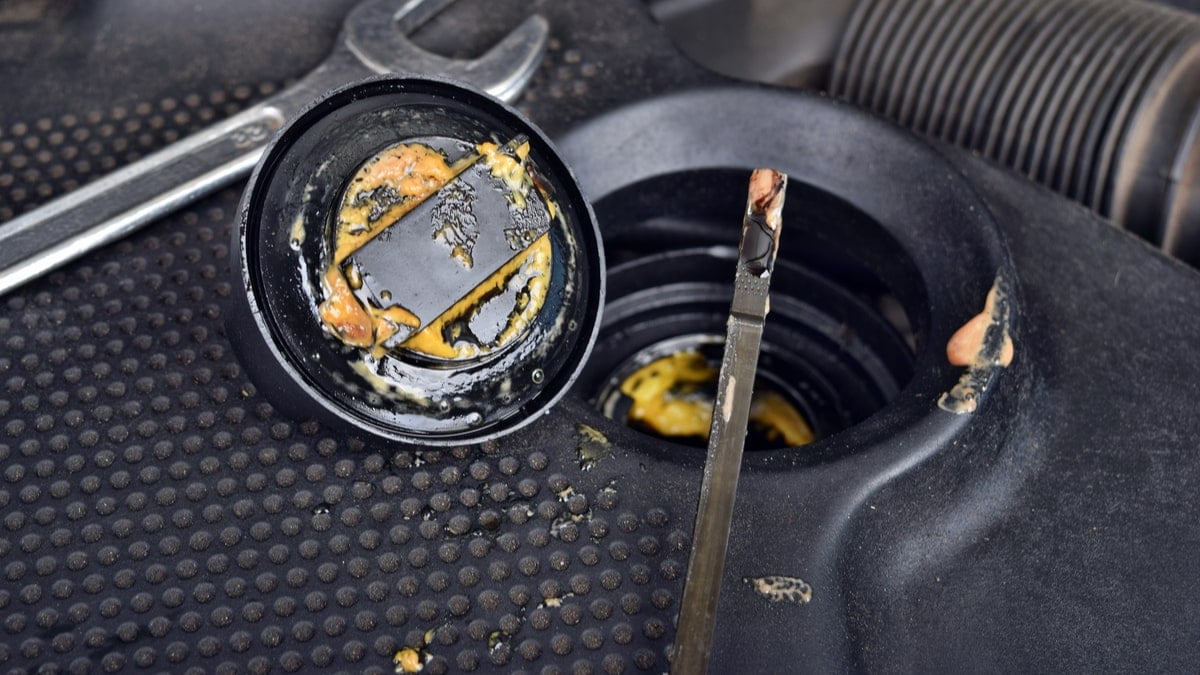
One such instance would be when you find a milky white substance on the dipstick. What does milky oil on the dipstick mean and how should you fix it?
In this guide, I will cover the reasons for milky oil on the dipstick, showing you the simple solution and the one you likely don’t want to deal with. I also outline how to stop it.
In This Article:
Causes for Milky Oil on the Dipstick
When the oil dipstick becomes milky white, it means that water has mixed with it. As the two substances mix together, a white sludge is created. Because water should never be present in the engine, you must take a closer look at what’s causing the problem, as it could be related to a blown head gasket.
Here is a more detailed list of the reasons why your car’s oil dipstick is milky:
1. Condensation or Moisture
There are certain parts of the country that deal more heavily with damp and humid conditions. In these areas, it’s possible for moisture to build up in the motor. You might first spot this problem by watching the exhaust gases because water vapor will be produced.
In normal operating conditions, the engine gets to regular temperatures and the moisture is burnt off. However, not everyone drives their vehicles far enough to get the motor this warm, leading to the moisture sitting in the engine. When the condensation goes unchecked, it can create a milky white substance on the dipstick.
Additionally, you might have gotten water into the motor when you were cleaning the engine bay. If you use a pressure washer, it’s possible you got water into the oil. It can also get into the power steering cap or through the air filter, none of which is good.
RELATED: What is This White Stuff Under My Oil Cap?
2. Blown Head Gasket
If you know anything about engine problems, you know this is one condition you don’t ever want to face. If moisture can’t be blamed for the milky white residue on the dipstick, you might have a blown head gasket.
The role of the head gasket is to keep the cylinders protected with an airtight seal. With this seal, the cylinders operate as intended because there’s the right amount of compression. This gasket is also needed to keep the oil and coolant separated, even though both can be found in the motor.
When the head gasket blows, coolant starts leaking into the oil passages or into the combustion chamber. What you are left with is the white, milky substance on the dipstick.
A blown head gasket will create other symptoms that you can look for. You might notice white smoke coming from the exhaust or the engine could start overheating. It’s also possible to spot bubbles in the coolant overflow tank or radiator. If you are refilling the coolant but have yet to find an external leak occurring, it’s possible that the fluid is infiltrating the oil passages instead.
3. Faulty Oil/Coolant Heat Exchanger
Some car engines have a heat exchanger installed that maintains the oil temperature using the coolant temperature. Sometimes a gasket of these heat exchangers gives up, or a crack inside the exchanger itself. This will result in a milky oil on your dipstick.
However, most car models do not have this part so you should check your repair manual or reasearch more if your engine is equipped with one.
Fixes for Milky Oil on Dipstick
1. Take Longer Drives
If there’s nothing wrong with the motor, you can burn off the moisture that might be inside the engine. By simply adding some time to your normal short trips, you can get that condensation to go away quickly.
For drives under ten minutes, it’s possible that the engine never reaches the right operating temperature, especially if you are just casually driving through town. Instead, you want to put a little more time into your drive. I recommend taking the long way to your next destination, especially if you don’t plan to drive again for some time. You also want to try and get the speeds up to 60 mph, which will run the condensation out quicker than if you are driving 25 mph.
2. Wash Engine Carefully
If you want to wash out the engine bay, you can do it yourself, but there must be some caution involved. You don’t want to get any water into the engine, or it can cause massive damage. Before you get started, pop the oil cap off and check the seal. If the seal is worn, it can’t stop water from getting into the engine, and you should replace it first.
With the seal in great shape, it’s time to spray down the motor, but make sure you use a low-pressure setting. It’s okay to use your household pressure washer, but it should be set as low as possible to get the job done. However, don’t ever spray on the engine seals directly, because these aren’t meant for this level of pressure.
Otherwise, you could use an engine degreaser to get the surface clean. With a scrub brush and cleaner, you should be able to wipe away any debris. Plus, you only need a small stream of water to rinse it away, so there’s no chance of getting oil inside the motor.
3. Repair Blown Head Gasket or Heat Exchanger
Diagnosing a heat exchanger can be quite tricky without the right knowledge. Research if there are more people with the same engine suffering from the same issue online. If there are many reports of failed exchangers on your car engine model, it could be the same on yours. To diagnose the heat exchanger, you either have to remove it completely and check the gaskets or use a pressure tester.
Once the head gasket fails, there aren’t many more options to consider. You can find a wide variety of head gasket sealers on the market. Many people advise not to use these, and it’s important that you decide what’s best for your car. But it’s unlikely that you will be in a worse situation from using one, so it might be worth trying.
RELATED: How to Test if the Head Gasket is Blown (7 Easy Steps)
Otherwise, you need a new head gasket. While the part is only about $125 to $350, the labor adds a whole bunch of money to the bill. Depending on what type of vehicle you have and the area you live in, you could put out another $650 to $1,750 in labor costs. Plus, you will be without your vehicle for at least a few days while it is being worked on. If your vehicle isn’t worth the fix, it’s time to start car shopping.


