
Modern cars are getting a lot more advanced, and nowadays, you can’t even replace your brake pads on your own vehicle without a computer.
This is at least what we are hearing from our customers. But is it true? Has it really reached the point where you need a computer to replace your rear brake pads?
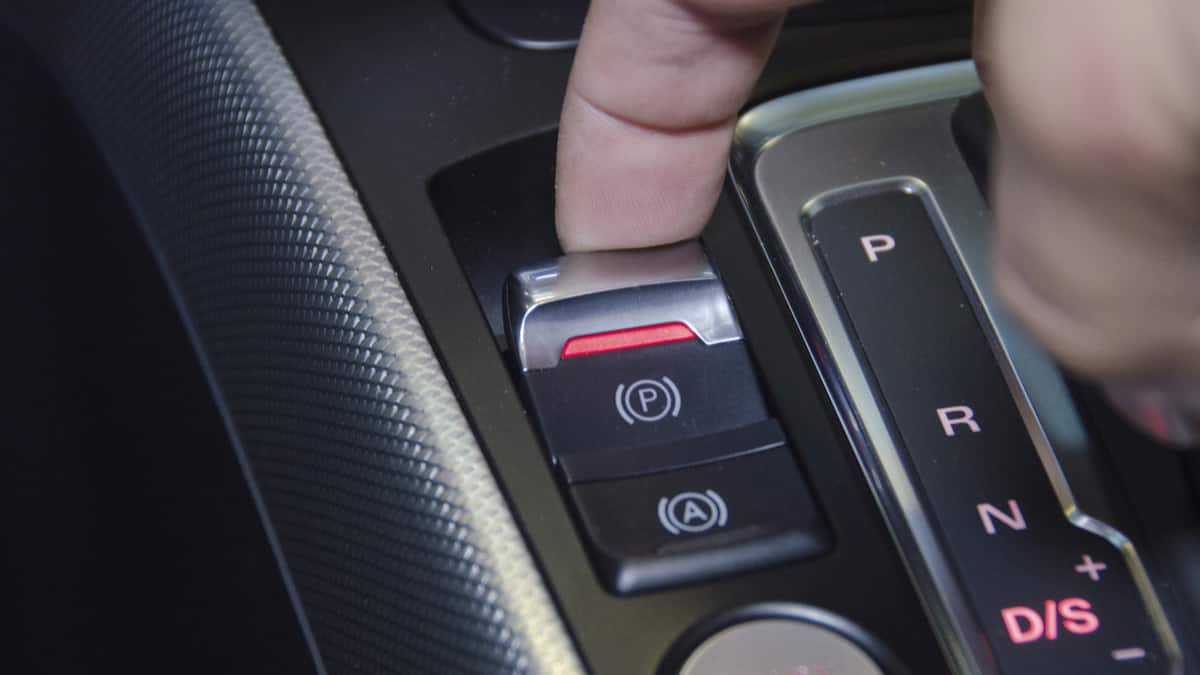
In this article, you will learn how to replace your electric parking brake’s brake pads with or without a tool.
In This Article:
How to Replace Brake Pads With an Electric Parking Brake
1. Connect a car battery charger
2. Connect a diagnostic tool
3. Loosen the parking brake pistons
It is also possible to push back the pistons with 12v+ power and ground, but nothing I will talk about here involves doing this, because it can damage your parts. You also need to do a calibration afterward, which is difficult without a tool.
If you need a tool for this, you can check out our guide: best diagnostic tools. Make sure it is compatible with your EPB system for your car model.
4. Remove Caliper & Push Pistons
For this, you may need a tool like this from Amazon.
5. Replace Brake Pads
6. Reinstall Caliper
7. Push out the pistons
8. Reengage parking brake pistons
9. Calibrate parking brake pistons
10. Test the parking brake button
What happens when the electronic parking brake fails?
Two things may happen when an electronic parking brake malfunctions, depending on what’s causing the issue. If it fails to engage, the vehicle will not be secured while parked, increasing the risk of a rollaway. This is especially dangerous when the car is sitting on an incline. On the other hand, the parking brake’s mechanism may jam or seize while engaged. If this happens, the electronic parking brake will not disengage when the driver presses the e-brake button, leaving the car’s back wheels blocked.
How do I reset my electronic parking brake?
Many car makers have left the possibility for the driver to reset the electronic parking brake. While the procedure may differ depending on the make and model, the basic steps are usually very similar. Start by turning on the ignition, pressing the brake pedal, and shifting the transmission into neutral. Then, press and hold the e-brake button for several seconds until you hear a mechanical whining noise from the back of the car. When the whining sound stops and the e-brake light starts flashing on the dashboard, release the button. After a few seconds, press the button once again to engage the electronic parking brake.
How do you compress a brake piston with an electric parking brake?
There are two ways of doing this, with connecting a diagnostic tool being one of them. But in most cases, an ordinary OBD2 scanner will not do the trick, as these usually can’t access the electronic parking brake’s control module. Instead, you’ll need a device compatible with your car’s EPB system. Alternatively, you could release the brake pistons by dismantling the parking brake mechanism. This method, however, requires a lot of skill and can go horribly wrong if not done correctly.
How much does it cost to repair or replace the electric parking brake?
Repairing or replacing the electric parking brake is relatively expensive, especially compared to conventional, cable-operated versions. This is because of the complexity of these systems, which have electronic control modules and electric motors that operate the rear calipers. In most cases, even the simplest repairs will cost you more than $100.
Replacing brake pads is one of the easiest maintenance tasks on a car – or at least this was the case before car makers started fitting electronic parking brakes on their models. These button-operated devices are also semi-automated, as they apply the parking brake on their own once the car is turned off.
In addition, they incorporate an uphill assistant feature, which holds the handbrake engaged when starting from a standstill on an incline. But due to their complexity, e-brakes are more prone to failures than conventional, cable-operated variants. Moreover, a suitable diagnostic tool is usually needed for replacing rear brake pads in cars with electronic parking brakes.


The certified mechanic was changing my chrysler 200 brakes and rotors when the electronic brake, with separate motors on each rear caliper, engaged while the caliper was off the rotor. The piston came all the way out and fluid leaked everywhere. Now he is scared to complete the job. Do I need new caliper?s
I was under the impression that all of the electronic park brake system have pistons that push straight back (after the motor is released) whether euro or asian cars
If that happened Larry, then how would the motor refit… as the piston will be extended to the same position as it was in when the worn pads were in situ. Clearly, the motor mechanism needs winding back. On German cars like Audi and BMW, this can be done with the required OBD2 diagnostic tool.